MegaShift 4L60E Wiring
The 4L60E is controlled through 14 pins. These are:
| Inputs to GPIO |
| Pin | Function |
| L | Temperature Sensor Signal |
| M | Temperature Sensor GND |
| N | Pressure Switch A (aka. Input1) |
| R | Pressure Switch B (aka. Input2) |
| P | Pressure Switch C (aka. Input3) |
| n/a | 2WD/4WD Input (ground for 4WD) |
||
| n/a | Vehicle Speed Sensor (VSS) - has its own 2-pin connector |
| Outputs from GPIO |
| Pin | Function | Control | Limits |
| A | Sol A (1-2/3-4) Switched GND (aka. Output1) | On/Off | 20-40 Ohms (0.75 Amps Max.) |
| B | Sol B (2-3) Switched GND (aka. Output2) | On/Off | 20-40 Ohms (0.75 Amps Max.) |
| C | Pressure Control Solenoid High | Power (nominal +12V) | Switched 12V from harness |
| D | Pressure Control Switched GND | PWM (293Hz) | 0 to 60% (3.5 - 4.6 Ohms at 20°C, 1.1 Amps
Max.) |
| E | +12 Volt Power | High (nominal +12V) | Switched 12V from harness |
| U | Lock-Up Feel Solenoid Switched GND not always used | PWM (32 Hertz) | 10-11.5 Ohms at 20°C |
| S | 3-2 Sol Switched GND (aka. Output3) | PWM (50Hz) | 9-14 Ohms at 20°C |
| T | Torque Converter Clutch Solenoid Switched GND | On/Off | 20-40 Ohms (1.5 Amps Max.) |
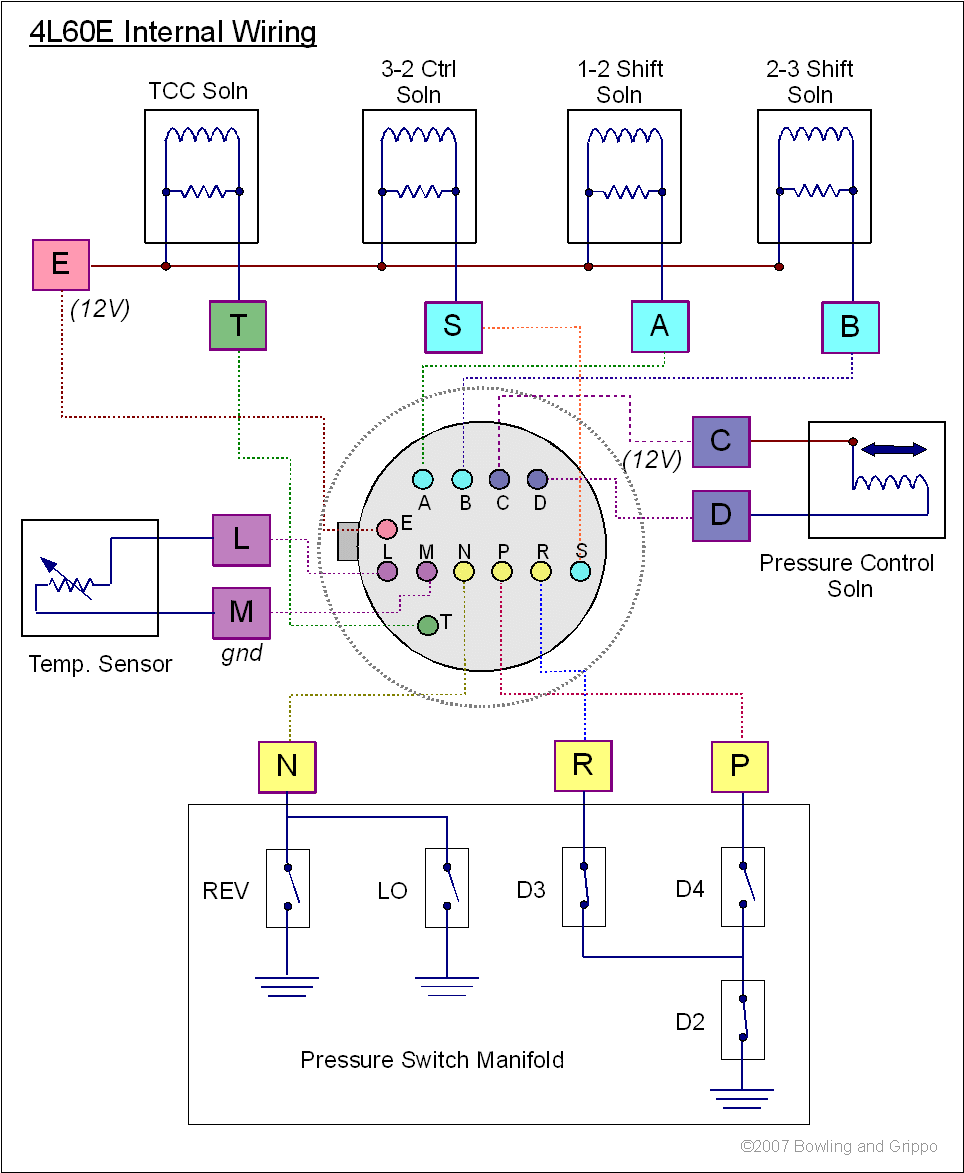
The wiring inside the 4L60E transmission looks like this:
The corresponding AMPseal connections for the control/sense functions are:
Function | Port | Circuit | AMPseal Pin |
| Sol A (Output1) | PE4 | VB3 | 23 |
| Sol B (Output2) | PM2 | VB4 | 35 |
| Sol32 (Output3) | PT1 | PWM4 | 34 |
| PC | PT2 | PWM3 | 33 |
| TCC | PT3 | PWM2 | 32 |
| LED1 | PM4 | GPO1 | 10 |
| LED2 | PM3 | GPO2 | 7 |
| LED3 | PM5 | GPO3 | 8 |
| LED4 | PB4 | GPO4 | 9 |
| switchA (Input1) | AD0 | EGT4 (jumper) | 26 |
| switchB (Input2) | AD1 | GPI2 | 6 |
| switchC (Input3) | AD3 | EGT3 | 25 |
| Paddle UP | PT6 | VR2 | 15 |
| Paddle DOWN | AD6 | GPI5 | 4 |
| VSS | PT0 | VR1 | 2 |
| Temp Sensor | AD2 | GPI3 | 30 |
| Brake Sense | AD7 | GPI4 | 3 |
| Speedo Output | PT4 | PWM1 | 31 |
| non-CAN MAP/TPS/MAF | AD5 | EGT1 | 24 |
| line pressure sensor | AD4 | EGT2 | 27 |
| 2WD/4WD switch | PE1 | GPI1 | 5 |
| Spare Output1 (LU Feel/Clutch) | PT7 | VB1 (jumper) | 11 |
| Spare Output2 (Clutch) | PA0 | VB2 | 12 |
In addition there are:
| Function | AMPseal Pin |
| Power In (+12V) | 1 |
| Power Grounds | 18, 19, 20 |
| Vref (+5V) | 28 |
| Sensor Ground | 17 |
| CANH | 13 |
| CANL | 16 |
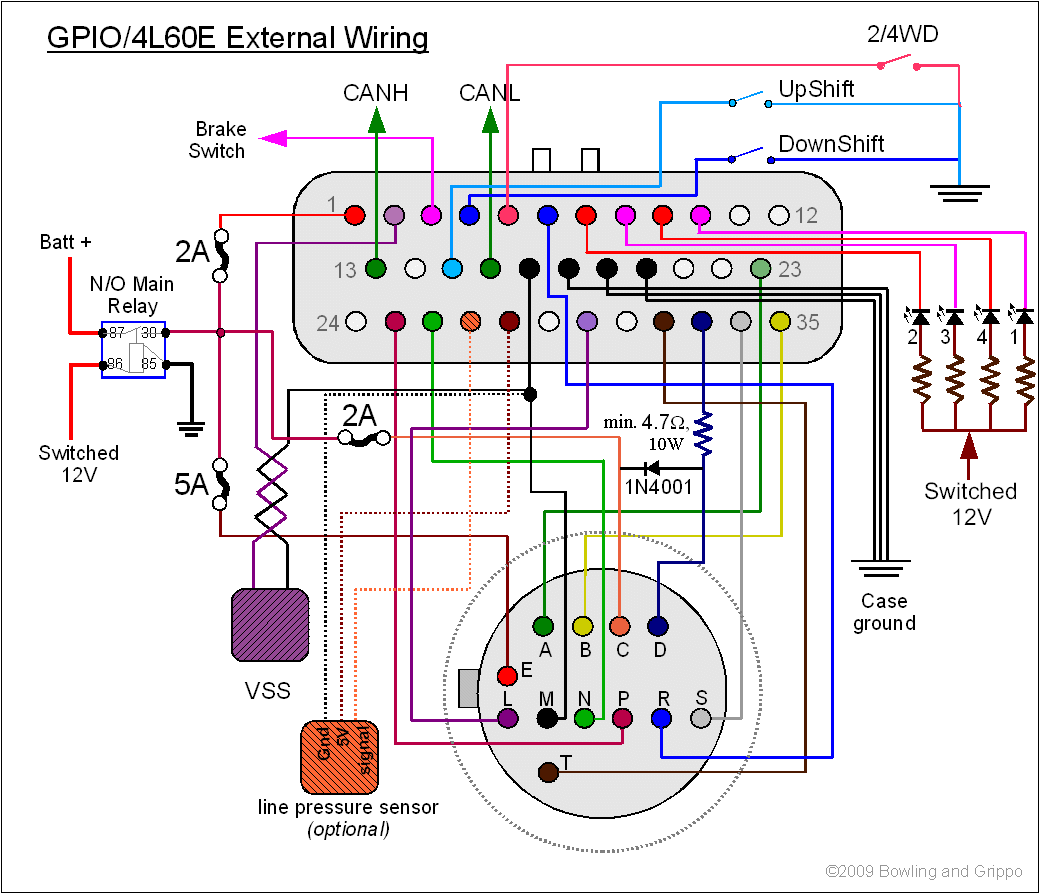
On the GPIO, the connections are:
- CANH: Ampseal connector pin 13,
- CANL: Ampseal connector pin 16.
On MS-II controllers, the CAN paths are:
- CANH: CPU pin PM0 (#45) → 40-pin socket pin 6 → JS6 jumper to SPR1/CANH → DB37 pin 3,
- CANL: CPU pin PM1 (#44) → 40-pin socket pin 11 → JS8 jumper to SPR2/CANL → DB37 pin 4.
The CAN termination resistors are already in place on the MS-II controller and GPIO board.
To wire the 4L60E transmission to the GPIO board, you need to make a number of connections:
Notes:
- For the pressure control (PC) solenoid:
- You need a minimum 4.7 Ohm (or higher resistance - up to ~10 Ohms), 10 Watt (or more) resistor (such as Digi-Key 4.7CWBK-ND, $1.67) on the pressure control solenoid wire from the trans connector pin D to the GPIO board's pin 33. This resistor dissipates up to 4 Watts of power at low line pressures (maximum PWM percentages). As a result, the resistor can get hot, so mount it on a heat sink (ideally a metal block) in an area with plenty of air circulation.
- In conjunction with that resistor, you will need a 1N4001 recirculation diode placed between pin C and D on the 4L60E connector (the closer to the transmission connector the better). Be careful to orient the diode correctly.
These two additional external components cut the flyback spikes from the solenoid to manageable levels preventing damage to various GPIO board components and potentially cleaning up external signals such as the VSS.
- Any solenoid that is pulse width modulated (including the shift solenoid outputs, TCC, and LUF), if they are PWM'd) require that you put a flyback diode on the solenoid. The illustrated instructions are here: Recirculation Diode Instructions. Install an external diode between that solenoid's voltage supply and the line going to the GPIO board. The banded end of the diode goes to the voltage supply wire, the non-banded end of the diode goes to the line to the GPIO board. Install the diode as close to the solenoid as is convenient. The 1N4001 diode is installed externally to avoid bringing high-voltage noise into the GPIO. 1N4001 diodes are available at virtually any electronics supply shop. Without this external diode in the PWM circuits, you may damage some internal components.
- The four resistors for the LEDs can be 330 to 390 Ω, ¼ Watt.
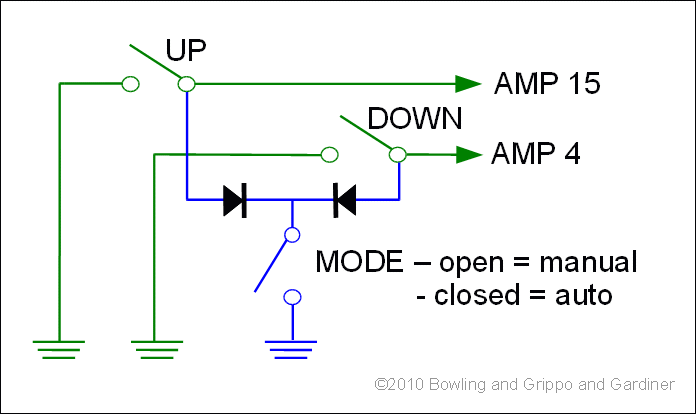
- If you want a 'mode selection switch' to force auto mode or enable manual mode, you can do this with a switch and two diodes (1N4001 or equivalent):
When the mode switch is closed, auto mode will be used, regardless of what you do with the shift buttons. If the mode switch is open, pushing either the upshift button or downshift button will put you in manual mode (and pushing both OR switching the mode select switch to auto will put you back in auto mode).
Sensors:
The 4L60E uses three types of sensors:
- Temperature Sensor, used to determine TCC lock-up,
- 3 Pressure Switches (not that these are sometimes called 'transmission pressure switches, TPS, but they should not be confused with the Throttle Position Sensor), used to determine the currently selected gear (i.e., the shift lever position),
- Vehicle Speed Sensor (variable reluctance [VR] type), used for a number of criteria.
Notes:
- There is an early and a late model of the 4L60E transmission. The difference is the addition of the "Lockup Feel" solenoids (aka. TCC PWM solenoid).
- VSS (vehicle speed sensor) on 2WD vehicles is in transmission extension housing, on 4WD vehicles the VSS is in transfer-case.
- The ECU also senses a brake switch and turns off the TCC solenoid whenever brakes are applied.
- TCC lock-up solenoid is normally only energized in 4th gear, if the transmission temperature is above 250°F it will energize it in 2nd and 3rd as well.
- Duty cycle on the Pressure Control solenoid is inversely proportional to the throttle angle (as throttle angle increases, duty is decreased). At idle (minimum throttle), the duty is at max (60%). At WOT (wide open throttle), the duty is at min (0% or off). Note that the PC solenoid takes the place of the Throttle Valve cable on earlier transmissions. In the TunerStudioMS interface, the 0-60% signal has been converted to a 40-100% signal, where 100% means maximum line pressure, and 40% means minimum line pressure. This *should* be more intuitive for the user, hopefully.
- All solenoids share common 12V line on pin E (except Pressure Control solenoid, which has its own +12 Volt supply on pin C) and are switched on and off with ground.
| Shift Pattern | Sol A (1-2/3-4)
Output1 | Sol B (2-3)
Output2 | 3-2 Sol
Output3 | TCC Sol (LU) | LockUp Feel*** | Pressure Control solenoid Sol | Ratio |
| Park | ON | ON | | | ON # | ON * | N/A |
| Reverse | ON | ON | | | ON # | ON * | 2.294 |
| Neutral | ON | ON | | | ON # | ON * | N/A |
| 1st | ON | ON | | | ON # | ON * | 3.059 |
| 2nd | OFF | ON | ON *** | ON/OFF** | ON # | ON * | 1.625 |
| 3rd | OFF | OFF | ON *** | ON/OFF** | ON # | ON * | 1.000 |
| 4th | ON | OFF | ON *** | | ON # | ON * | 0.696 |
| LU | ON | OFF | ON *** | ON** | ON # | ON * | N/A |
- * The Pressure Control solenoid controls main line pressure, pulsed at 0-60% duty cycles at 293 Hertz. There is no cleaning pulse (dither) every 10 seconds on this transmission (unlike the 4L80E).
- ** The TCC is pulsed (frequency is 32 Hertz, with duty cycle varied). Maximum current should not exceed 1.5 AMPS.
- *** The 3-2 Sol is pulsed at 50 Hertz, 0% duty in 1st, 90% duty in all other gears. During a 3-2 downshift, the duty is decreased and this duty is related to the vehicle speed; lower speed, lower duty.
- # The Lock-Up Feel (LUF) solenoid was probably put in high end Cadillacs for seamless shifting. In first gear, at approximately 13 km/h (8 mph), the OEM ECU pulses the LUF (aka. TCC PWM) solenoid valve at approximately 90 percent duty cycle. This duty cycle is maintained until a TCC apply is commanded. When vehicle operating conditions are appropriate to apply the TCC, the OEM ECU immediately decreases the duty cycle to 0 percent, then increases it to approximately 25%. The OEM ECU then ramps the duty cycle up to approximately 50% to achieve regulated apply pressure in vehicles equipped with the Electronically Controlled Clutch Capacity (ECCC). With the ECCC system, the pressure plate does not fully lock to the torque converter. Instead a consistent slip of 20 to 40 RPM is maintained. The rate of increase of the duty cycle controls the TCC apply rate. Similarly, the PCM also ramps down the LUF solenoid duty cycle to control TCC release. With some high torque or high vehicle speeds, the converter clutch is fully locked by the OEM ECU.
Solenoids:
| Solenoid | Resistance
(Ohms at 68°F) | Typical
Inductance
(milliHenries) |
| Solenoid A | 20 - 40 | 43.0 |
| Solenoid B | 20 - 40 | 43.0 |
| 3-2 Solenoid | 9 - 14 | 14.1 |
| TCC | 20 - 40 | 56.9 |
| LU Feel | 10 - 11.5 | not known |
| Pressure Control | 3.5 - 4.5 | 8.1 |
Pressure Switch Manifold
The pressure switch manifold (PSM) is a multiple switch assembly consisting of 3 normally open (NO) pressure switches and 2 normally closed (N/C) pressure switches.
Fluid from various hydraulic control circuits is fed to this the pressure switch manifold which allows the ECU to determine which gear the shift lever is currently shifted into (not necessarily the actual gear the transmission is in). The switch contacts are normally open and close when fluid pressure causes them to. Depending upon the circuit, the switch may provide a ground path when closed. The table below shows a pin that is grounded by the PSM as a "0", while an open circuit shows a 12 (volts).
| Gear | Pin N
Input1 | Pin R
Input2 | Pin P
Input3 |
| Park | HIGH | low | HIGH |
| Reverse | low | low | HIGH |
| Neutral | HIGH | low | HIGH |
| 4th (Overdrive) | HIGH | low | low |
| 3rd (Drive) | HIGH | HIGH | low |
| 2nd | HIGH | HIGH | HIGH |
| 1st | low | HIGH | HIGH |
Case Connector

| Pin | Function |
| A | Sol A (1-2/3-4) Switched GND
Output1 |
| B | Sol B (2-3) Switched GND
Output2 |
| E | +12 Power |
| N | Pressure Switch A
Input1 |
| R | Pressure Switch B
Input2 |
| P | Pressure Switch C
Input3 |
| M | Temperature Sensor GND |
| L | Temperature Sensor Signal |
| S | 3-2 Solenoid Switched GND
Output3 |
| D | Pressure Control Solenoid Switched GND |
| C | Pressure Control Solenoid +12V |
| U | LU Feel Solenoid Switched GND |
| T | TCC Solenoid Switched GND |
Main Line Pressure Tap
MegaShift has a line pressure sensing/logging function built it. It is Digikey MSP6907-ND for $114. It's a 0.5-4.5 Volt output (accuracy &plusminus;5 psi), and has just a three wire hookup:
- 5V from Vref on Ampseal pin #28,
- ground, and
- signal to Ampseal pin #27.
It has a 1/8 NPT fitting - the same as the transmission port. However, a 90° elbow, or maybe even some tubing, will be required in most installs to keep the sensor away from the transmission tunnel.
4L60E Temperature Sensor Output
| °C | °F | R (Ohms) |
| -40 | -40 | 100544 |
| -28 | -21 | 52426 |
| -16 | -10 | 18580 |
| -4 | 23 | 12300 |
| 0 | 32 | 9379 |
| 7 | 40 | 7270 |
| 19 | 68 | 3520 |
| 31 | 86 | 2232 |
| 43 | 110 | 1200 |
| 55 | 131 | 858 |
| 67 | 145 | 675 |
| 79 | 176 | 333 |
| 91 | 194 | 241 |
| 103 | 213 | 154 |
| 115 | 239 | 115 |
| 127 | 260 | 79 |
| 139 | 284 | 60 |
| 151 | 302 | 47 |
MegaSquirt® and MicroSquirt® controllers are experimental devices intended for educational purposes.
MegaSquirt® and MicroSquirt® controllers are not for sale or use on pollution controlled vehicles. Check the laws that apply in your locality to determine if using a MegaSquirt® or MicroSquirt® controller is legal for your application.
© 2004, 2016 Bruce Bowling and Al Grippo. All rights reserved. MegaSquirt® and MicroSquirt® are registered trademarks. This document is solely for the support of MegaSquirt® boards from Bowling and Grippo.