This troubleshooting guide is intended to help you sort out connection issues between your laptop and your GPIO/MShift™ controller. Typically these are things like TunerStudioMS error messages of the sort "Controller code version does not match signature ..." (which is caused by an INI file not matching the loaded code, in this case) or "ERROR: Command not recognized, e=0xE1" which usually means a serial port connection with your GPIO/MShift™ controller connected to it was not found.
There are certain things that have to be in place and functional for your GPIO/MShift™ controller to talk properly to your laptop:
Here are what you need to check if your laptop PC does not talk with your GPIO/MShift™ controller:
- With a GPIO/MShift™ controller, if you are using the 3/32" serial jack, be sure the DB9 and mini-stereo connectors are fully seated. You must use a properly configured cable. You can devise your own serial cable, the illustrations below might help.
Cable:(same as LC-1/MicroSquirt cable): If you don't already have a serial cable (from an MicroSquirt or Innovate LC-1 wide band EGO controller)you will need to make one. To do this, solder the three wires of the 2.5mm stereo plug cable {CP-254CS-ND} to the DB9 connector {4109FER-ND} as shown below (cut the yellow wire so it can't short against the DB9 connector), then cover the connection with the DB9 hood {976-09RPE-ND}.
The serial communication connections to the DB9 using either the Ampseal pin or the mini-stereo serial jack are:
| Function | Ampseal Pin | Mini-Stereo Jack | DB9 Pin |
| Tx | 22 | ring
(right channel for stereo) | 2 |
| Rx | 21 | tip
(left channel for stereo) | 3 |
| Ground | 17 | barrel
(ground) | 5 |
If you look carefully at the DB9 connector mating surface, you will see that the pin numbers are embossed into the plastic adjacent each pin.
- If you are using the Ampseal connector to bring serial comms out (rather than the mini-stereo jack), check that the wiring matches the table above. Many users connect the Ampseal serial pins to a DB9 connector, which can then be plugged into like a normal MegaSquirt or MegaSquirt-II, like this:
Note that the Ampseal pin numbers 1, 12, 13, 23, 24 and 35 are imprinted into the plastic connector adjacent these pins to help you orient the connector and find the appropriate pins.
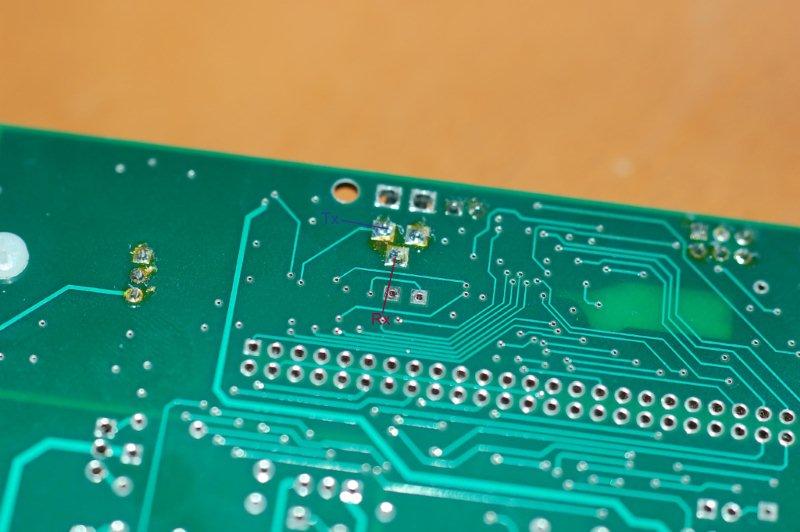
To test the connections, with the serial cable disconnected and the power off, check the resistance from Ampseal pin 22 to the serial jack pad closest the voltage regulator (the Tx path); and the resistance from Ampseal pin 21 to the serial jack pad furthest from the PCB edge (Rx path). Both should be less than ~1 Ohm.
Also check the resistance between the Tx and Rx pads/pins. It should be 'infinite'. If eiher of these aren't right, inspect the board carefully to find out why.
The standard connection is to use:
- Rx: Jumper from the via marked "Rx" near the bootloader jumper to the via marked "Rx" near the Ampseal connectors rear edge with 20-24 gauge insulated wire. This will bring Rx out on Ampseal pin 21.
- Tx: Jumper from the via marked "Tx" near the bootloader jumper to the via marked "Tx" near the Ampseal connectors rear edge with 20-24 gauge insulated wire. This will bring Tx out on Ampseal pin 22.
- Ground: Use one of the Ampseal pins 17 to 20 as a ground.
- Check the serial port on the laptop/PC. We need to verify that your laptop/PC actually has a functional serial port before proceeding.
- If you have a USB/serial adapter instead of a built in serial port:
- You may have to play with the USB adapter COM port settings in Windows for the adapter to get it to work (see Control Panel→System→Hardware→Device Manager).
- Make sure that your com port settings are correct for your serial port or your USB/serial cable. For example, change the baud rate (under 'Start→Control Panel→System→Hardware→Device Manager→Ports (COM & LPT)') to 115200 for MShift™ code.
- Try re-installing your USB driver.
- Check this thread on the www.msefi.com support forums for new info: USB to Serial Adapters.
- First check that nothing else is using the serial port, such as a fax/modem. Make sure the downloader is closed (TunerStudioMS and the downloader shouldn't be open at the same time, they will interfere with each other). To find if other programs are running, first try 'Ctrl-Alt-Del' all together (but just once). This should list all the programs that are running. Look for any that *might* be a fax/modem (you must keep systray and explorer). You can kill any extraneous programs you find directly from the dialog that springs up when you do ctrl/alt/delete, or you can look in 'start/program' to see if any fax/modem software is listed and configure it to not start on power-up. Alternatively, you can also type msconfig in the run box to see what is starting and block any program from loading.
- On your laptop PC, be sure to disable any other programs that might try to use the serial port, etc. This includes Infra-red communications (IrDA). For example, if you have your IrDA switched on it might go looking for a connection at regular intervals (usually in the middle of something important).
- You should turn you serial device's FIFO buffers off if possible (using the Device Manager), or at least set them as low as possible if that is the only option available). None of the other serial port default settings matter. The downloader, or TunerStudio, etc. over-ride them. However, FYI they are over-ridden with:
- Baud: 115200,
- Flow control: None,
- Stop Bits: 8,
- Data bits: 1.
- You may have to try different com port numbers (COM1, COM2, ... COM99) to find out which com port number is assigned to the physical connection you are using for MegaSquirt. If you have installed code, you can use the portCheck.exe utility to find the port the controller is on. Be sure to note which com port you successfully used for the loopback tests, you will need to enter it later into other downloading and tuning programs.
- Try re-installing your USB driver.
- Go to 'Communications/Setting' and 'Detect' the connection to your GPIO/MShift™ controller, then 'Accept' the connection when it is found.
- Search the forums at www.msefi.com for new info on: "USB to Serial Adapters".
- If you have another computer available (a laptop or another desktop, for example), you might want to try that to connect to your your GPIO/MShift™ controller - this can help rule out a damaged or mis-configured serial port on the computer.
- Check the power supply. your GPIO/MShift™ controller must be powered in order to communicate. Use a nice clean supply - not a battery charger!
- Check for a functional processor. If you suspect the processor itself, the first thing to try is to reload the code (see the next step) since this is free and will often solve a processor problem. Of course you need a working serial port to do this, so you may have to try all the other steps first.
- Check that you have appropriate code loaded on the processor. Your V3 MicroSquirt comes loaded with code and should communicate with the laptop/PC. It isn't impossible that this was missed at the factory, so if you suspect you have no code, follow these steps:
Download the code from the Internet. Get the latest version of MShift&trade code here:
Follow the instructions on the above pages to load code. Here is a summary:
- Power down your GPIO/MShift™ EFI Controller,
- Place a jumper over the bootloader header pins,
- Power up your GPIO/MShift™ controller by applying 12V power to Ampseal pin 1 and ground to one of the pins from 17 to 20.
- Start the downloader program (make sure TunerStudioMS is not running), and select the appropriate COM port (from the loopback tests) and speed (115200 for your GPIO/MShift™ controller),
- Select the appropriate .S19 file (that you downloaded above), and the downloader will read, write and verify the code to the processor in about 10 seconds or so.
- The process ends with a message like "Verification succeeded, ??? records total (4 skipped)."
- Shut down the downloader program.
- Remove power from your GPIO/MShift™ controller.
- Remove the bootloader jumper.
- When you power your GPIO/MShift™ controller back up again, it should come to life running the newly loaded code.
- Install and configure a program on the laptop/PC to talk to MegaSquirt®, this is usually TunerStudio. For TunerStudioMS details, see the TunerStudio website.
- Open TunerStudoMS and set the com port (from your loopback tests) and the baud rate (115200 for MegaSquirt-II) under 'Communications/Settings'.
- If you have changed code version (or loaded code for the first time), you may need to change the INI file to match the new code. All the INI files are here: INI Files. The INI files have names like "GPIO_MShift_4122.ini", where 4122 indicates the 4.122 code it is to be used with. The code S19 loadable files here: Code (.S19) Files
You may also need to install a fresh INI file if you have edited it manually, and made any mistakes (which is easy to do and often shows up as a comms error - typically the controller will connect with the tuning software, but then it will go offline after a second or two, and not re-connect unless the power is cycled - starting the process again).
You can select new INI to match code you have loaded by:
- going to 'File→Project→Project Properties' in TunerStudioMS,
- checking the 'Other' box,
- clicking on 'Browse',
- surfing to the INI, and
- double clicking on the correct INI.